Category Archives: Photography Techniques

National Geographic Weekend Photography Workshop

Have you ever been to a weekend photography workshop?  I recently found that National Geographic offer photography excursions and workshops.  I am thinking of attending one but am very torn on which location to go to (Paris, Rome, New Orleans, Tucson, etc) and which type of photography workshop would be best suited for my skills, or  lack of skills.   Each offer something different in the way of photographing architecture, people, landscape, etc.  If you have reviewed any of my images please provide any comments that you have about your experienced at these workshops and types of photography that you think are best.

A full list of the workshops can be found here if you are interested: National Geographic Photography


Abstract Photography Created by Cropping

I am one of those people that (oddly enough) is hesitant to take a picture if I’m not sure how it will turn out.  Last weekend while in Canaan Valley West Virginia we visited SmokeHole Caverns.  I finally decided to take a few shots that I wasn’t sure of.  I took a few shots of the wall that actually worked well.  Caves are one of those places that I’m scared to take images of because the light is random and it’s always lit with spot lights.  Please note the images below.


This image turned out well with the light from the cave but the spotlights themselves had to be cropped out.  Once those items were cropped out its lovely with the colors and the layers.

SmokeHole Caverns West Virginia bacon staligmite

f/4.8 ISO 2500


This image is taken from the cave floor up the wall.  I used the camera flash for this image as the other lights were too high to illuminate the part of the wall I wanted to focus on.  As the camera flash is not idea you can clearly see the shadows created from the imperfections of the wall.  Those some of the shadows add to the image, some also distract from the image.  Some additional cropping could assist in correcting this issue.

Smokehole Caverns West Virginia canaan valley wall

f/3.5 ISO 2500

Flow of Water in Photographs

Many people recommend using different filters (neutral density) when photographing water and waterfalls.  I typically agree with this and have previously done this in practice.  This weekend while out in Canaan Valley in West VirginiaI had the opportunity to go to Blackwater Falls. This is a beautiful little place and just a short walk (192 steps) down to the wonderful waterfall.  I was playing with shutter speeds, exposures, etc trying to get the shot I wanted without having the filters I thought I needed.

Below are the 2 photos taken from the same spot within a minute of each other with different settings.  This will help to show some of the things you can do if you know the details of your shutter speeds and how to alter it.

Blackwater Falls exposer 1/25 sec at f/3.5


Blackwater Falls exposure 1/6 sec at f/19


You can see how the longer exposure make the water stream and flow nicely rather than show every drop coming down.  This is something the the filters will do for you as well without the need to change the settings on your camera.


Workflow with Digital Images

Many of us always remember the basics of our workflows.  Its the items like “keywords” and “naming conventions” that we don’t take the time to add to our photos when we initially upload and start working on them.

I am just as guilty if not more guilty of this than everyone else.  I finally got annoyed with it and started working through my many gigs of photos.  Luckily I have them grouped in directories that assist with some of this so I can add keywords in 1 fail swoop, then go back for the specific different ones later.  This is still taking a tremendous amount of time that I would rather use processing  photos.

Please remember to complete your keywords and any naming convention changes the day you drop your photos on your machine, it will save so much work later!

Lake Scott Car Show

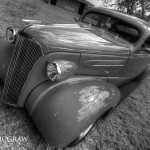
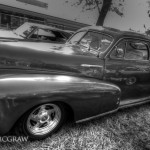
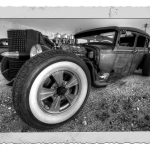
This year I managed to make it back to Scott City Kansas for the Lake Scott Car Show and my dad’s b-day. I took several pics around the park and elsewhere around town. I love the perspective that the wide angle lens gives to cars, it’s wonderful! Below are 3 images each with the wide lens (12-24mm) and all turned black and white.
If you haven’t noticed yet, black and white is may favorite. I do like color images and how vibrant they can be, but I have a special connection with the black and white.

You can see more about the Lake Scott Car Show posted on The Horses Asses Car Club site here.

Photographing Fireworks

Fireworks are the same principle as photographing lightening depending on your distance from the firework and the desired affect.

For the following with a sparkler I used the same settings as the post I did previously about lightening (ISO to 100, WB to light bulb, and Aperature to 5.6), you can see the lightening post here.

The image I really wanted to play with is below, it’s my husband helping me out a little playing with a sparkler.
I love you

This image was only resized, no retouching, I’m not sure how you would go about retouching/fixing an image like this.

I used the same settings on this image:

As you can see this image has the same streaking as the I Love You image above. This is shown due to the settings on the camera and the amount of time the shutter is open. Both of these actions happened within feet of me. Had I altered the settings to cloudy, or a higher ISO there would have been far less streaks and would not have produced these affects.

Unfortunately I was busy playing with the fireworks and didn’t take many different types of shots so I do not currently have another other options to show you at the different settings.

Lightening Photograph

Last week it was storming and the lightening was just amazing. I set up the tripod in my garage (so the camera would not get wet), wet the ISO to 100, WB to light bulb, and Aperature to 5.6 and took these images.

I converted them to black and white because I love black and white but they could have been left in color as well. If you look closely you will notice that there are multiple strikes in the images, the shutter was open for an extended period of time due to the amount of light that the camera was waiting for. This helps to create more impressive photos with multiple strikes. These of course are not some of the greatest images out there but they show the point. If you are set up in the right location you could probably get several more strikes and have a more impressive photo.